
 |
| I have always wanted the white pumpkins you see in the magazines around the autumn season.But just can't seem to bring myself to spending that kind of money on something that wouldn't last for more than one season being I have limited funds to just play around with .As for the good artificial ones they can be kind of pricey .So I found a way to make my own out of things I have around my house or can buy easily . |

Finished stuffed pumpkin will measure approximately
39 inches around by 5 inches high plus the stem which is about 7 inches .
Materials I used,a large ruler or yard stick,fabric scissors , piece of vintage bleached muslin white fabric 46 inches by 18 inches, needle and thread that compliments the fabric, cotton twine but you could use any strong yarn ,fast grabbing fast drying glue ,pillow stuffing .

Fold your fabric in half ,line up the edges ,sew up opposite side so you make a tube.In my excitment to make my cheese pumpkin I forot to take pictures of this part so ,I improvised .But you can get the idea from this picture .


Then pull closed tightly .

Wrap the extra thread around and knot ,cut off excess.

Wrap you twine or string around the side you just sewed and pulled tight ,again as tightly as you can and tie in a knot.
Be sure to keep you twine or string about 4 inches longer then your fabric ,you will need this later to pull on ,and cut about a 4 inch piece and place it in arms reach to tight of the other end .


Once filled to desired amount ,I like mine to be a little squishy, I took a piece of the same string about 4 inches long wrapped around a few times and tied off the end .I like to have a nice long stem so I made sure I had plenty of fabric left to do this with .


I did this by wrapping the string around the pumpkin to give it the ribs or groves .We now have a Groovy Pumpkin,lol

I wrapped the string I used to pull up the center around the extra fabric and temporally tacked it place with glue to keep it out of my way ,you can remove this easily if you only use a very small dot of glue .
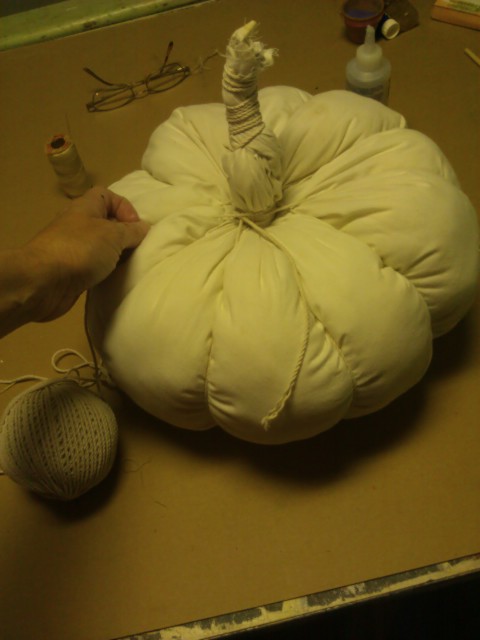
Wrap or rap while your wrapping , the string around the extra fabric to create the stem .just a little play with words to see if your paying attention.. lol. I un-tacked the piece I used to pull on, gave it another good tug cause my glue let loose and began wrapping it around the remainder of the stem then glued it, this time for good ,at least I would hope .I then used a needle and thread to get the strings up by the stem where I wanted them to be and to get a nice neat finish to my top .


So go make one ,play around with your materials create something that is all your own .
Low to no cost you could use an old pillow case ,old shirt,old sheet or even a leg of an old pair of pants for the pumpkin,yarn,natural twin or strips of fabric in place of the cotton twine , to wrap around an form the stem . Really the possibilities are endless.Use the stuffing from an old pillow or stuffed animal just laying around your house ,or you could fill it with dry saw dust to make it heavier ,just be sure that your fabric is a tightly woven so you don't have saw dust leaking out .You could even spray the finished pumpkin with a clear coat to use out side but out of the weather so it won't get wet . Hope you enjoyed my blog feel free to let me know how you did or if you found an easier way in the comments below or you could like my face book page
No comments:
Post a Comment